Editing audio is one of the most important steps in producing clean, professional-quality tracks. If you are using BandLab on PC, knowing how to cut audio properly can save you hours of frustration. Whether you’re trimming out mistakes, splitting sections for rearrangement, or preparing samples for mixing, cutting audio is a basic skill every creator should master.
In this guide, we’ll walk through how to cut audio in BandLab PC step by step. We’ll also look at practical scenarios, shortcuts, common mistakes, and advanced tips that make the editing process smoother.

Why Cutting Audio Matters in BandLab
Before learning the actual process, it’s worth understanding why this feature is so important. In BandLab’s web-based Digital Audio Workstation (DAW), cutting audio allows you to:
Remove unwanted noise or silence at the beginning and end of a recording.
Split a long recording into smaller sections for rearrangement.
Isolate key moments in a vocal or instrumental track for effects.
Create loops or samples from recorded performances.
Prepare audio clips for seamless mixing and mastering.
Essentially, if you want your track to sound polished, cutting audio is non-negotiable.
How to Cut Audio in BandLab PC
Now let’s break down the actual steps. Cutting audio in BandLab is straightforward once you’re familiar with the Editor workspace.
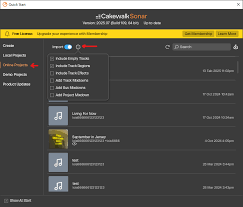
Step 1: Open Your Project in BandLab
Log in to BandLab.com on your PC browser.
Navigate to your Projects tab and select the project you want to edit.
Click Edit to open the Mix Editor.
This editor is where all the cutting, trimming, and rearranging happens.
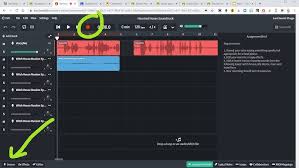
Step 2: Select the Track with Audio
Locate the audio region (sometimes called a “clip”) you want to cut. Audio clips can be vocals, guitar recordings, samples, or even imported MP3 files.
Click once on the clip to make it active. You’ll notice it highlights when selected.
Step 3: Move the Playhead to the Cut Point
The playhead is the vertical white line that indicates your playback position. To cut audio, drag the playhead to the exact spot where you want to split.
You can zoom in on the waveform by using the zoom controls at the bottom right of the screen.
For precise editing, zooming in is crucial because you can line up cuts with beats or syllables.
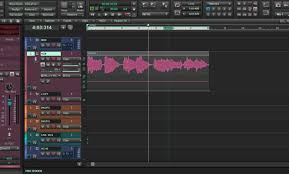
Step 4: Use the Split Tool
With the playhead in position:
Right-click on the audio clip.
Choose Split from the context menu.
Alternatively, use the keyboard shortcut S to speed up the process.
This will divide your audio clip into two separate regions at the playhead.
Step 5: Trim, Move, or Delete Clips
Once your audio is cut:
Delete unwanted sections by selecting and pressing Delete on your keyboard.
Drag clips around to rearrange parts of your song.
Trim edges by hovering over the beginning or end of a clip and dragging inward.
Advanced Tips for Cutting Audio in BandLab PC
Cutting audio is easy, but mastering it requires some tricks. Here are a few pro-level tips:
Use Snap-to-Grid
When you cut audio, BandLab’s Snap-to-Grid ensures your edits stay aligned with beats and measures. This is crucial if you’re working with drums or loops that need to stay in sync.
Combine Cutting with Automation
Instead of deleting every unwanted noise, you can cut sections and add volume automation to smooth transitions.
Experiment with Crossfades
After cutting, harsh edges may sound unnatural. Apply crossfades between clips to blend them seamlessly.
Work with Layers
If you’re experimenting, duplicate the original track before cutting. This way, you always have a backup of the raw audio.
Common Mistakes When Cutting Audio
Even though cutting is simple, beginners often run into problems:
Over-cutting: Splitting too often can clutter your timeline and make the project confusing.
Ignoring zoom: Cutting without zooming in leads to sloppy edits.
No grid alignment: If you cut off-beat, your track can sound messy.
Deleting instead of muting: Sometimes it’s better to mute a section rather than delete it, especially during experimentation.
Avoiding these mistakes ensures your audio stays clean and professional.
Real-World Uses of Cutting Audio in BandLab
Here’s how musicians and producers actually use this feature:
Podcasters cut filler words like “um” and “uh” from recordings.
Beatmakers slice samples into pieces to create new rhythms.
Singers cut multiple takes into one flawless vocal track.
Instrumentalists trim noisy intros or endings from live recordings.
No matter your creative field, cutting audio is a tool you’ll rely on regularly.
Alternatives to Cutting in BandLab
While BandLab’s cutting tool is solid, other DAWs like Audacity, FL Studio, and Ableton Live also allow precise editing. However, BandLab stands out because:
It’s free and cloud-based.
It offers real-time collaboration.
It saves projects automatically in the cloud.
For PC users who don’t want to invest in expensive software, BandLab remains a reliable choice.
Conclusion
Learning how to cut audio in BandLab PC is one of the first editing skills that can instantly improve your tracks. From trimming mistakes to creating loops, this simple process opens the door to more polished, professional audio.
By using the split tool, aligning with the grid, and combining cuts with effects like crossfades, you’ll elevate your music production in BandLab without needing extra plugins or software.
FAQs about Cutting Audio in BandLab
1. Can I cut audio in BandLab Mobile the same way as on PC?
Yes, but the process is slightly different. On mobile, you use the scissors icon to split clips.
2. Is there a shortcut for cutting audio in BandLab PC?
Yes, pressing S is the fastest way to split audio at the playhead.
3. Can I undo a cut if I make a mistake?
Absolutely. Just press Ctrl + Z (Windows) or Cmd + Z (Mac).
4. Can I cut MIDI tracks in BandLab too?
Yes. MIDI regions can be split just like audio clips.
5. Will cutting audio affect my original file?
No. BandLab is non-destructive, meaning your original recording stays intact.