Introduction: Unlocking the Power of AI Music Editing
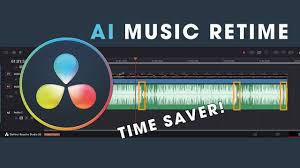
DaVinci Resolve 20.0.1 brought exciting AI-powered features that revolutionize how creators handle music and audio editing. Whether you’re a professional editor, YouTuber, or hobbyist, mastering AI music editing can save you time and enhance your videos’ sound quality.
In this article, discover the top 5 practical tips to maximize DaVinci Resolve’s AI Music Editor and create polished, engaging audio for your projects.
1. Use Proper Metadata for Better AI Recommendations
DaVinci Resolve’s AI leverages metadata tags like genre, mood, and tempo to suggest and analyze music tracks effectively. Before importing your music:
Tag your files with clear genres (e.g., “cinematic,” “ambient,” “pop”)
Add mood descriptors (“uplifting,” “dramatic”)
Include tempo markings if possible
This helps the AI provide more accurate beat detection, mood mapping, and track recommendations tailored to your project’s style.
2. Organize Your Timeline with Separate Audio Tracks
For optimal AI performance:
Place your voiceover/dialogue on one track
Put background music on a separate track
Use additional tracks for sound effects or ambience
This separation enables the AI to clearly identify voice segments for precise auto ducking and maintain balanced audio mixing automatically.
3. Leverage Beat Sync to Align Music With Visual Cuts
Enable the Beat Sync feature to let the AI detect beats and downbeats in your music. Align these markers with your video’s cuts or transitions for rhythmic flow. This makes your edits more dynamic and engaging, especially for:
Music videos
Travel vlogs
Product promos
Use the “Snap to Cut” option for quick alignment and smoother transitions.
4. Customize Auto Ducking Sensitivity for Clear Voiceover
Auto ducking automatically lowers background music during speech, but default settings might not fit every voice or environment.
Adjust the Ducking Threshold slider to control sensitivity
Lower values mean more aggressive ducking (great for soft voices)
Higher values keep music louder, suitable for energetic narrations
Fine-tuning ensures your voice remains clear without sacrificing music presence.
5. Experiment with Mood Mapping to Enhance Storytelling
DaVinci Resolve’s Mood Mapping adjusts music intensity based on your video’s emotional tone.
Choose from presets like Neutral, Emotional, Upbeat, or Tense
Combine mood mapping with your color grading for cinematic results
Use it especially in documentaries, wedding videos, or storytelling content
Mood mapping creates an immersive experience, guiding viewer emotions seamlessly.
Bonus Tip: Save AI Settings as Presets for Efficiency
If you frequently produce similar video styles, save your AI music editing settings as custom presets. This allows quick application on new projects, speeding up your workflow and maintaining consistent audio quality.
Conclusion: Mastering AI Music Editing in DaVinci Resolve
By applying these tips, you’ll unlock the full potential of DaVinci Resolve’s AI Music Editor—making audio editing faster, easier, and more professional. From organizing your timeline to fine-tuning ducking sensitivity, these strategies empower creators to focus on storytelling while the AI handles complex audio tasks.
Ready to elevate your audio game? Start integrating these tips into your next project and experience the difference.
FAQs
Q1: Does AI music editing work with all audio formats?
A: Yes, DaVinci Resolve supports common formats like WAV, MP3, AIFF, and FLAC.
Q2: Can I disable AI features if I want manual control?
A: Absolutely. All AI functions can be toggled on or off as needed.
Q3: Is AI ducking effective for multi-language videos?
A: Yes, it supports voice detection in over 13 languages.
Q4: Can I use these tips in the free version of DaVinci Resolve?
A: No, AI Music Editor features are exclusive to the Studio version.
Learn more about AI MUSIC

