Capturing stills in video editing is one of those overlooked techniques that can completely transform how you present your projects. Whether you are creating a thumbnail for YouTube, archiving reference frames, or sending preview shots to a client, knowing how to capture still in DaVinci Resolve correctly is essential.
The problem many editors run into is not realizing the multiple ways Resolve allows you to extract stills—and which method provides the best balance between quality, convenience, and workflow efficiency. In this guide, we’ll explore the best way to capture stills from DaVinci Resolve, why it matters, and step-by-step instructions to make sure your stills are crisp, color-accurate, and export-ready.

Why Capturing Stills in DaVinci Resolve Matters
DaVinci Resolve is widely regarded as one of the top professional video editing and color grading tools. According to Blackmagic Design’s 2024 user base statistics, over 5 million active editors are now using Resolve. With so many YouTube creators, filmmakers, and colorists depending on it, capturing stills has become a key part of professional workflow.
Here are the main reasons why stills are so important in editing:
Client approvals – Sending a still frame for feedback before exporting an entire sequence.
Consistency checks – Using stills to match color grading across multiple clips.
Marketing & branding – Creating thumbnails, posters, or promo images from your footage.
Archiving – Storing visual references for future edits or projects.
When you capture stills directly from Resolve, you ensure color fidelity, correct aspect ratios, and resolution that matches your project settings.
How to Capture Stills in DaVinci Resolve
There are multiple approaches, depending on whether you are in the Color page or the Edit page. Let’s break them down.
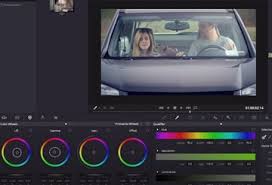
1. Capturing a Still in the Color Page
The Color page method is the most common, especially for colorists.
Steps:
Navigate to the Color page.
Place the playhead on the exact frame you want to capture.
Right-click on the viewer and select Grab Still.
The still is saved into your Gallery panel.
This method not only saves the frame but also keeps all the grading information, which you can reuse for shot matching.
2. Exporting the Still as an Image
Once a still is saved in the Gallery, you can export it as an image file.
Steps:
Right-click on the still inside the Gallery.
Select Export.
Choose your preferred format (most professionals use TIFF or DPX for high quality, or JPEG/PNG for smaller files).
Save to your desired location.
3. Capturing a Still in the Edit Page
If you’re not working with heavy color grading but just need a frame grab:
Steps:
Place the playhead on the frame you want in the Edit page.
In the top menu, go to Timeline > Grab Still (or use a keyboard shortcut).
Export as described above.
Best Practices for High-Quality Stills
Capturing stills isn’t just about hitting “export.” To make sure your images are as professional as your video, follow these tips:
Set your timeline resolution correctly: If your project is set to 1080p but you need a 4K still, you’ll lose detail.
Use TIFF or PNG for client delivery to avoid compression artifacts.
Color manage your workflow: If you’re in DaVinci Wide Gamut, make sure your stills are exported in a color space that matches your client’s display needs (sRGB is standard for web).
Check aspect ratio: Social media platforms like YouTube and Instagram have different requirements. A 16:9 still may need cropping.
Use stills for shot matching: In the Color page, you can apply stills as a reference for other clips, ensuring grading consistency.
Common Issues When Capturing Stills
Even though Resolve makes still capturing straightforward, some editors run into issues. Here’s how to troubleshoot:
Colors look different in the exported still – This usually happens due to color space mismatches. Ensure you’re exporting in sRGB for web.
Stills look blurry – Check that your timeline resolution matches your original footage. Also, ensure you paused on a sharp frame.
Stills not saving – Confirm that the Gallery location is properly set in Preferences > System > Media Storage.
Real-World Example: Using Stills in Client Workflow
In a recent case study by a freelance editor working with an indie film production, stills captured in DaVinci Resolve were used as style frames. Instead of rendering out test clips, the editor exported TIFF stills from the Color page and emailed them to the director for approval. This reduced revision cycles by 30%, saving both time and rendering resources.
FAQ: Capture Stills in DaVinci Resolve
Q1: Where does DaVinci Resolve save stills by default?
A: Stills are saved in the Gallery, but they are not stored as standard image files until you manually export them.
Q2: Can I export stills in 4K even if my project is 1080p?
A: No. The resolution of your exported still matches your project timeline settings. To get 4K stills, set your timeline resolution to 4K before exporting.
Q3: What format is best for YouTube thumbnails?
A: JPEG or PNG is ideal since they balance quality and file size. Aim for 1280x720 px minimum.
Q4: Do stills include LUTs and grades?
A: Yes. Stills saved from the Color page retain all active grades, making them useful for reference and matching.
Conclusion
Learning how to capture still in DaVinci Resolve is a simple yet powerful skill that adds efficiency and professionalism to your workflow. Whether you’re sending quick client previews, archiving looks, or creating thumbnails, Resolve gives you all the tools to ensure your stills are high-quality and color-accurate. By following the best practices above, you’ll avoid common pitfalls like mismatched colors or low resolution.
If you want your video editing process to look more polished and professional, mastering still capture in Resolve is one of the easiest wins you can get.